Ouch! My Eyes! Arduino WS2812B Setup & RGBW Transformation (Cabinet Light Pt. 3)
Now that the enclosure is in a good-enough state, it's time to start trying to get the lights working!
Supplies
- RGBW WS2812B (SK6812) strip from BTF-Lighting.
- Arduino Uno Starter Kit
- 12a 5v power supply.
Hardware
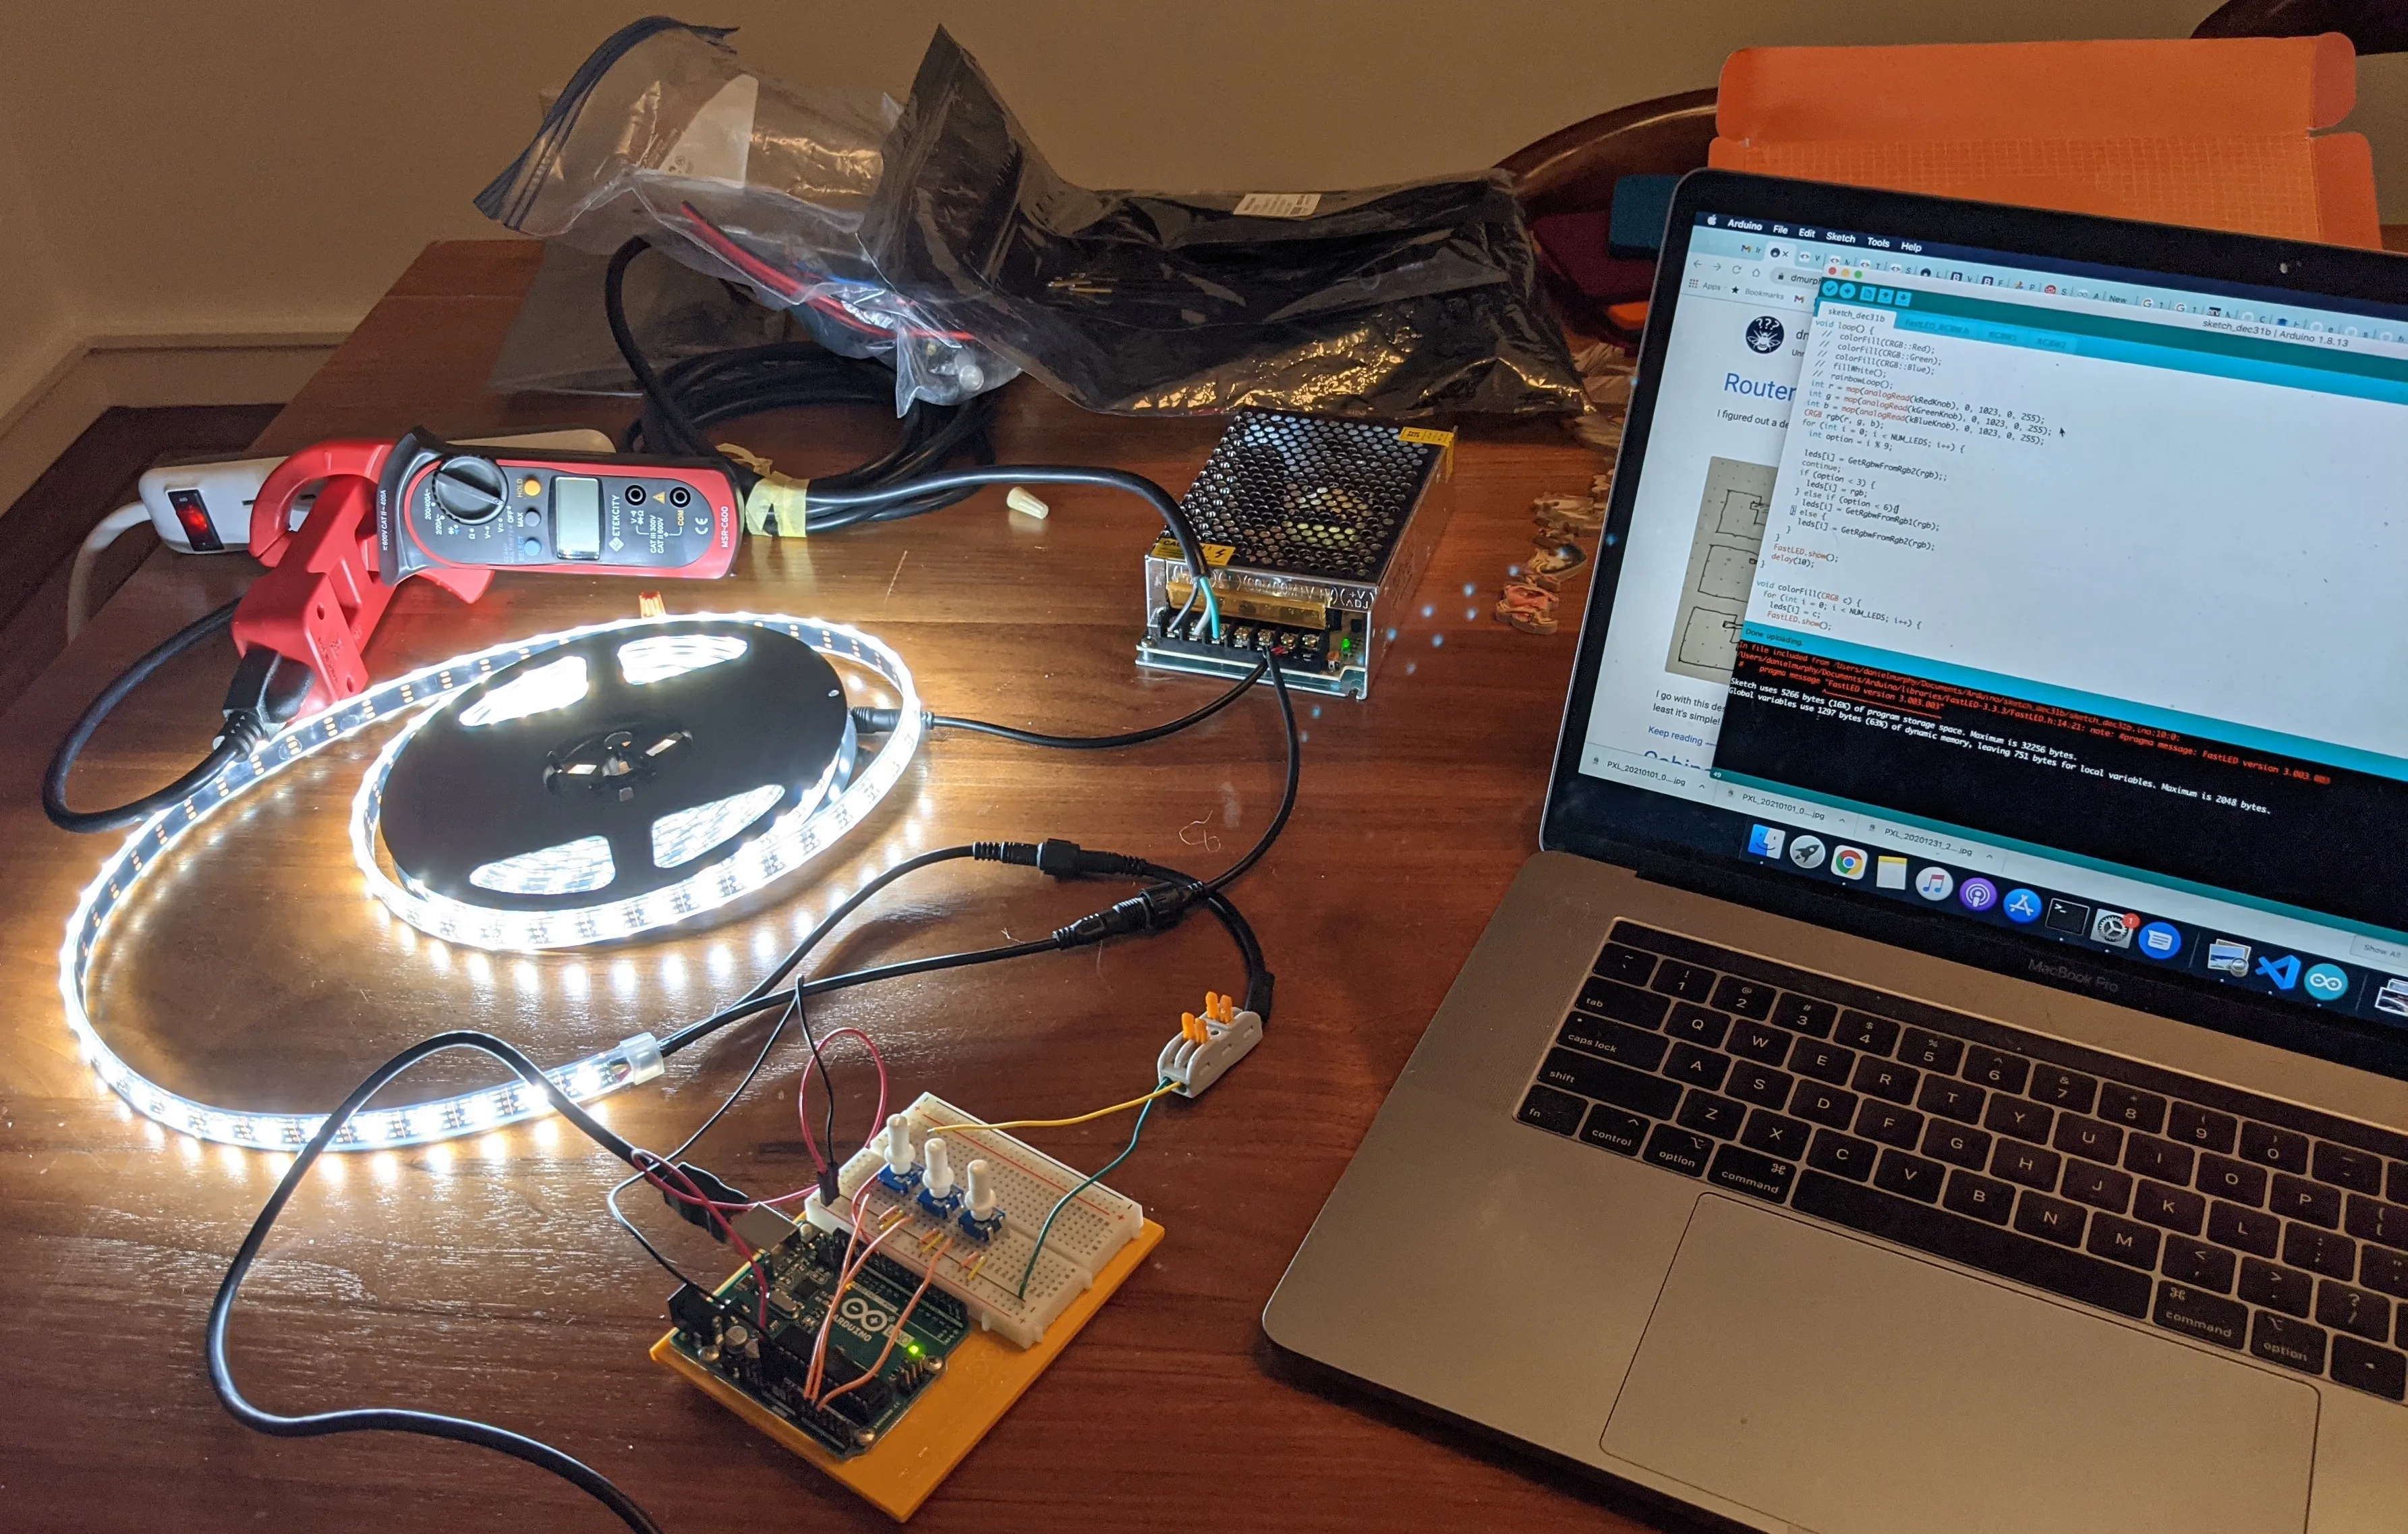
This is the hardware setup:
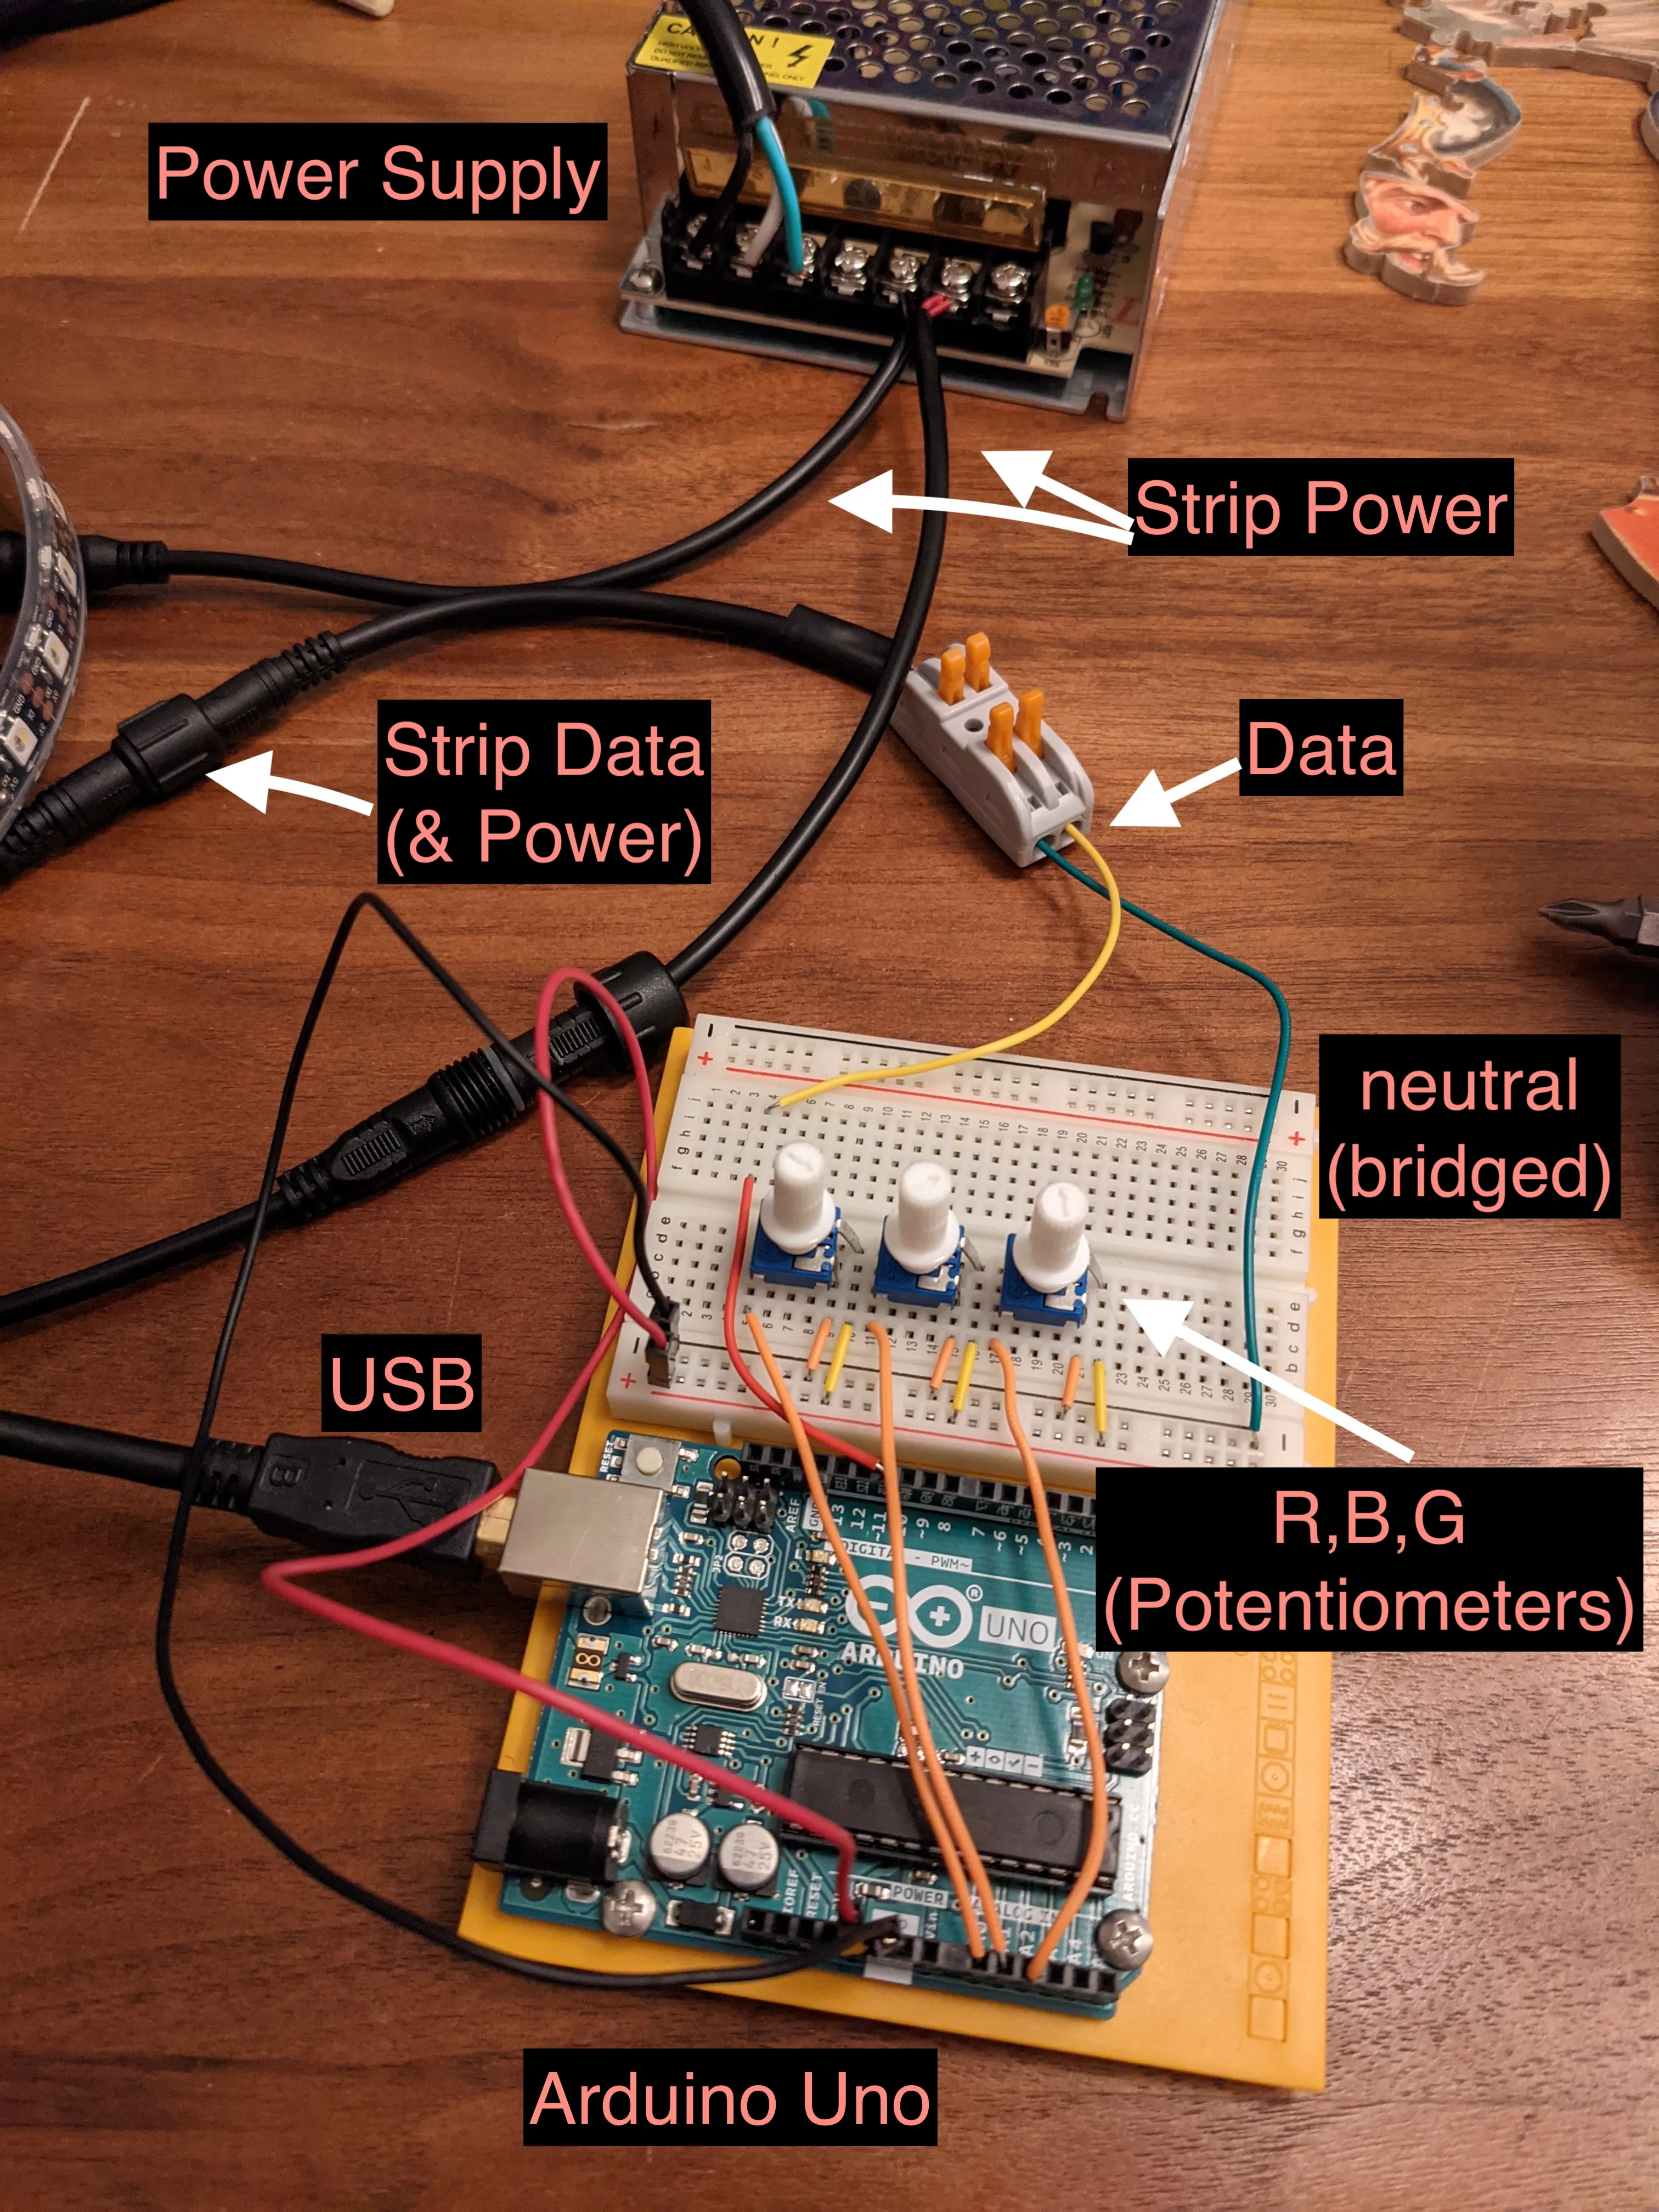
- Power Supply - 5v, 12a power supply (see calculations below). Powers only the strip, at both ends due to 5v & resistance along the strip line.
- RGB+WW Strip - This is a 5 meter, WS2812B (SK6812) LED Strip. WW stands for warm-white, which means it has 4 LEDs: red, green, blue, and warm-white.
- Strip Data & Data - This line contains 3 wires, 2 power (bridged to the power lines) and 1 data. I connect the common/neutral line to the Arduino neutral, tape the hot wire to prevent connection, and connect the data wire to the Arduino.
- R, G, B Potentiometers - These are connected to analog input pins on the Arduino to control the color.
- USB & Arduino Uno - USB goes to my laptop, which powers the Arduino Uno.
Power Calculations
Power calculations for testing setup:
- 5 meters
- 18 watts per meter, at 60 LEDs / meter, = 90 watts (see Note),
- 90w / 5v = 18amps for 5 meters
Will I need a full 18 watts per meter? I don't plan on using all 4 LEDs at once with full power. Let's explore the power comparison:
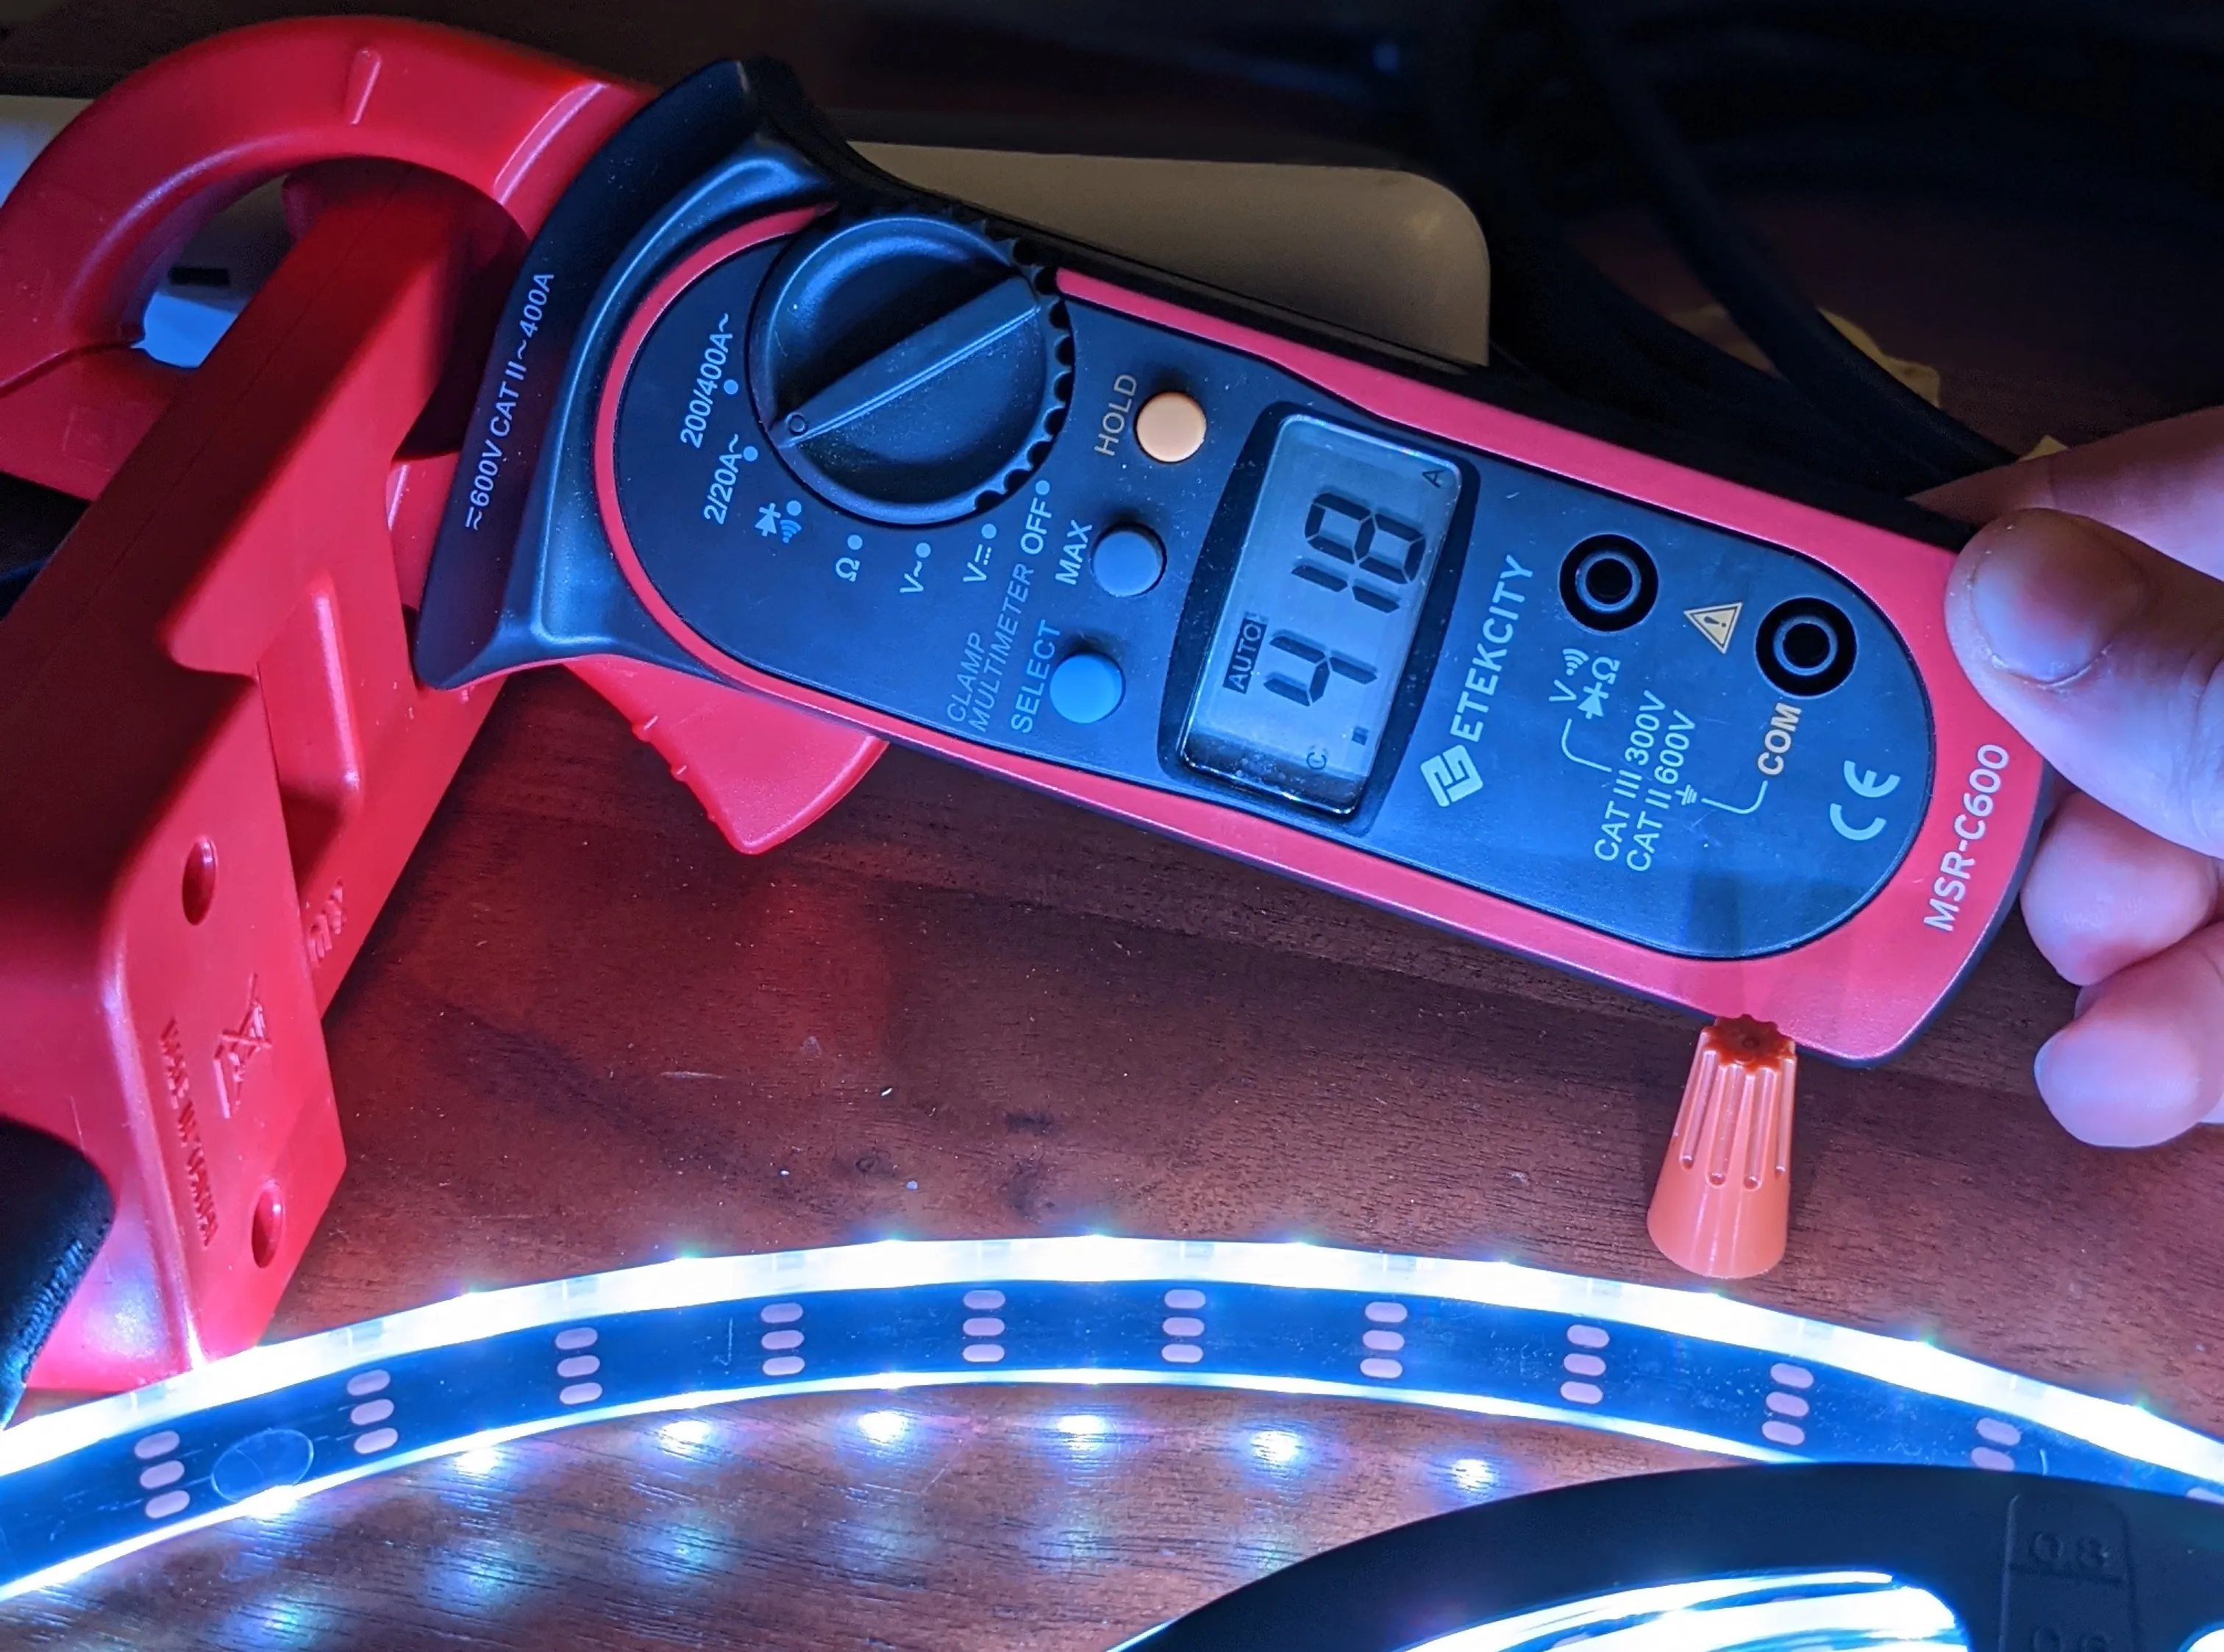
NOTE: This power supply is slightly under-powered (only 12a), and my 20a one wasn't working correctly. So some of the higher power reading here might be low / would be higher if the supply was more capable.
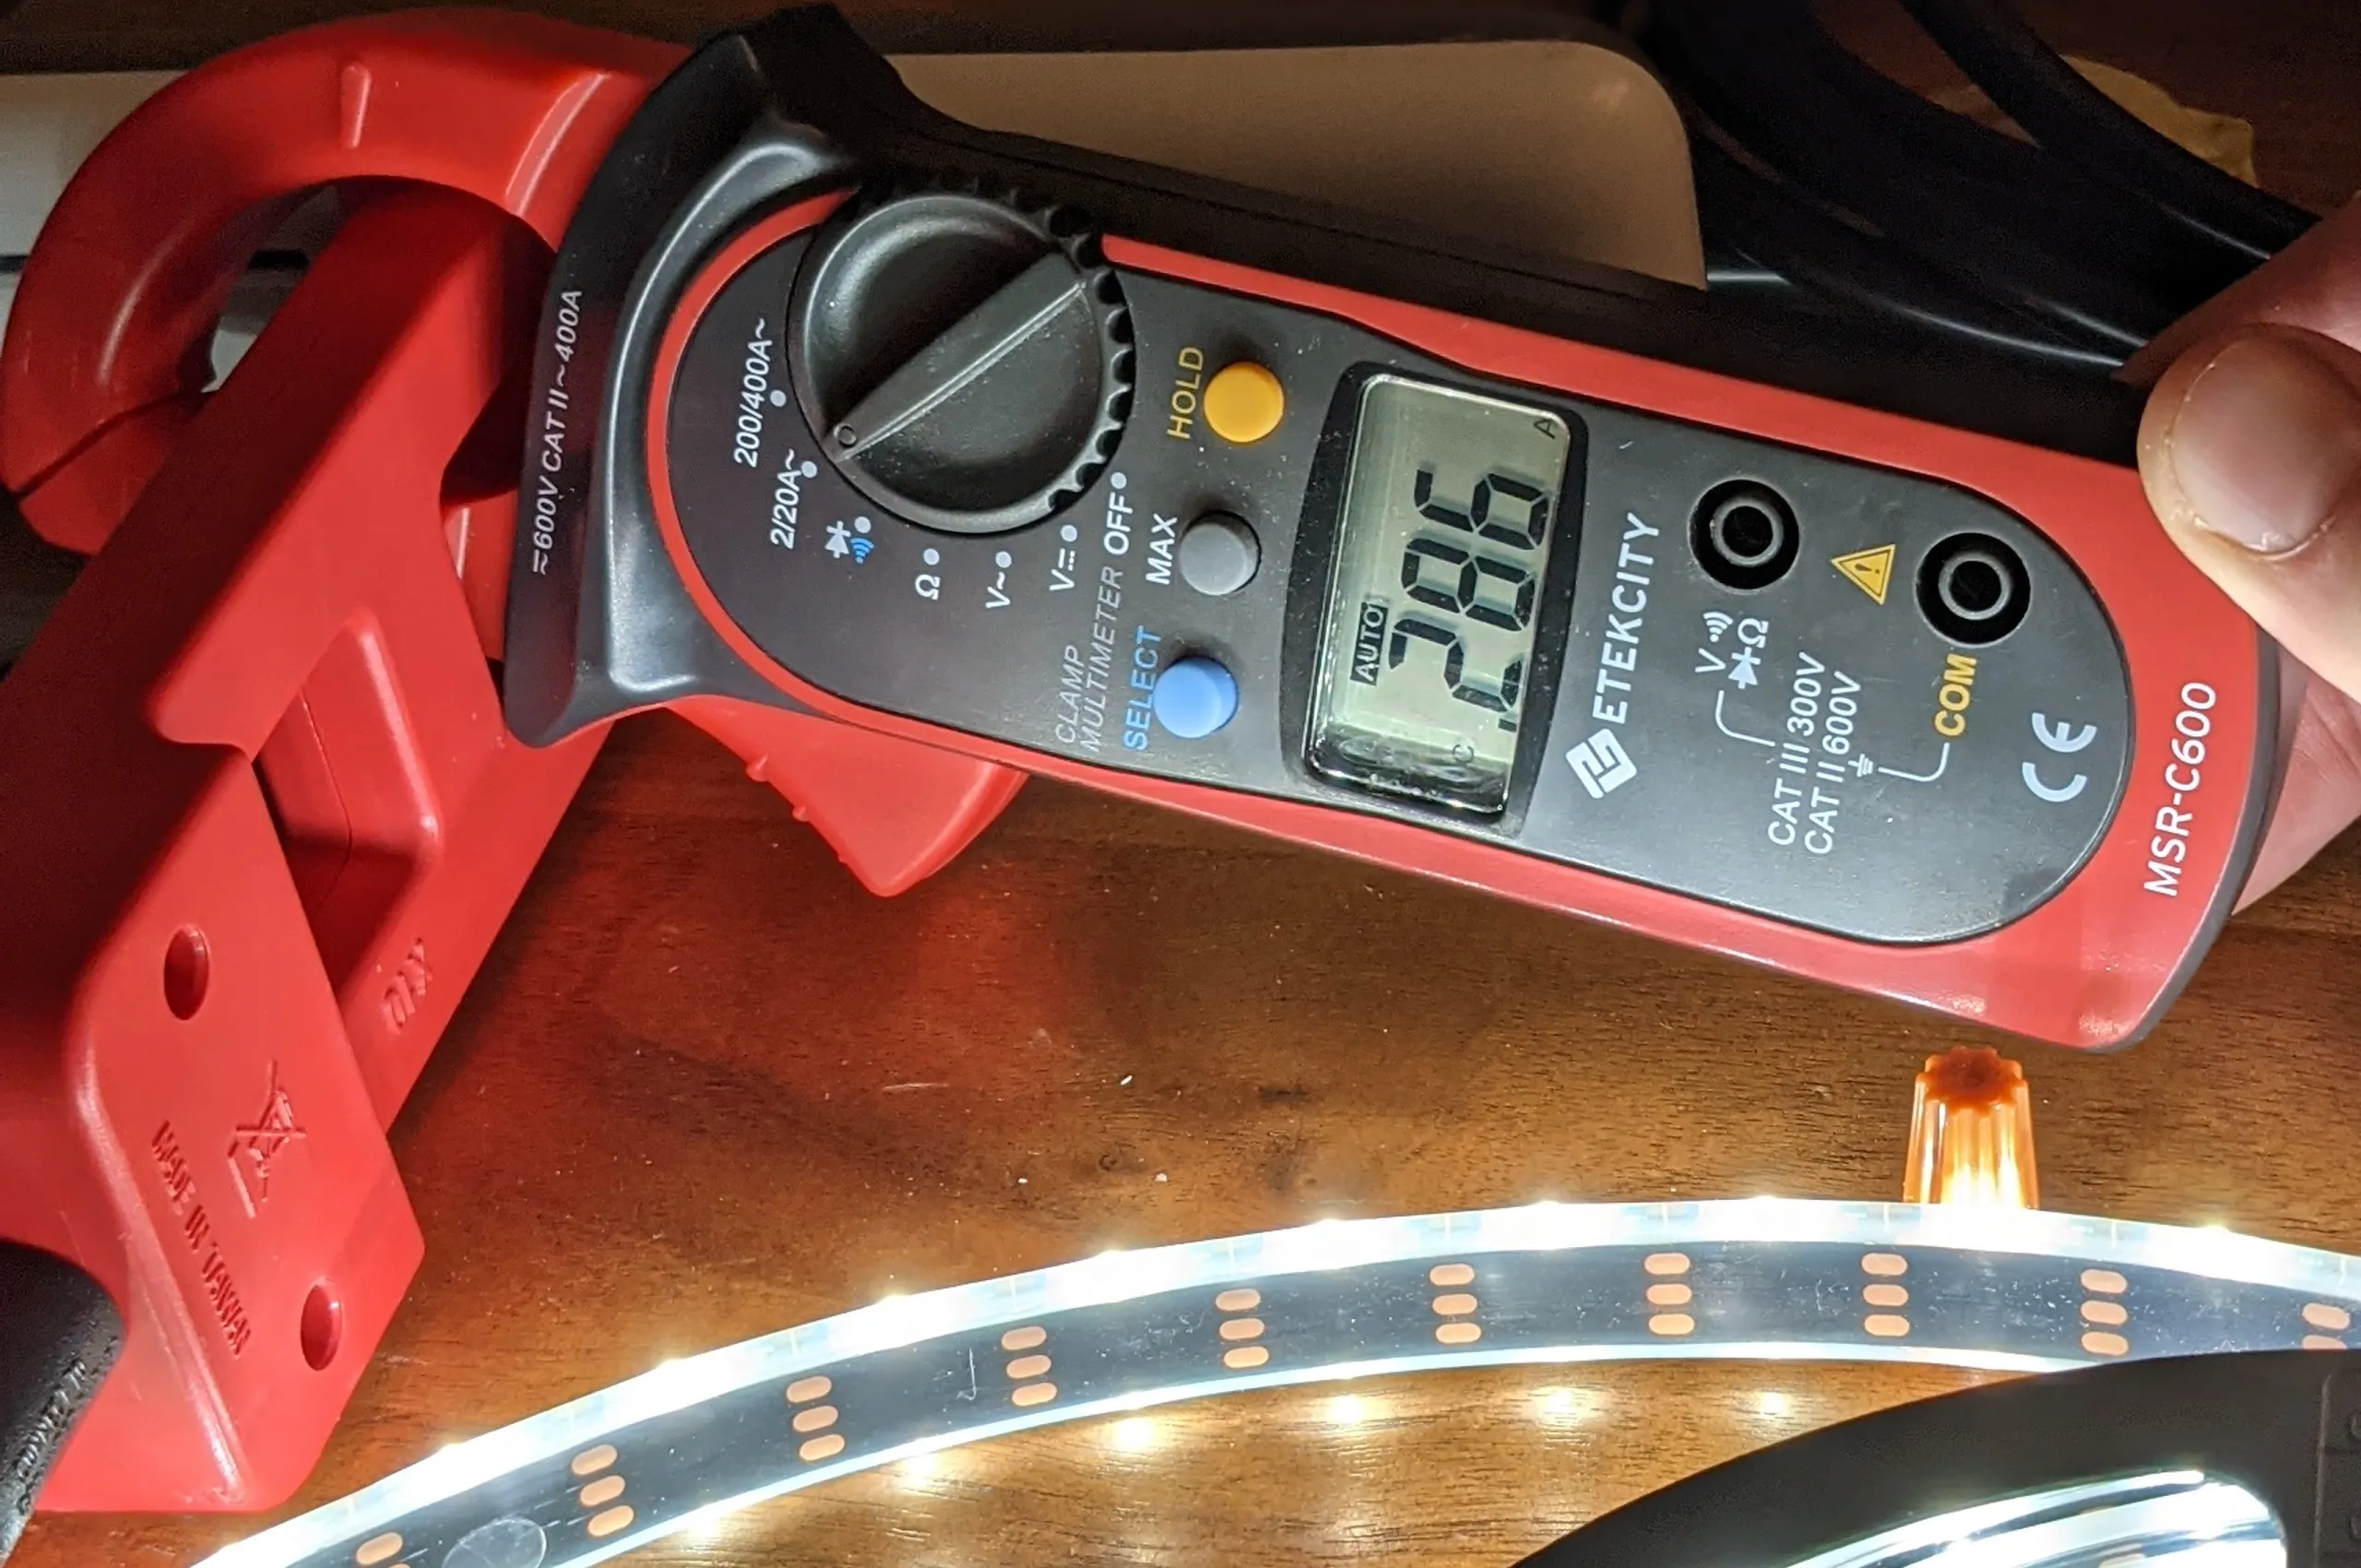
- RGB-only:
0.418a * 120v / 5v = 10 amps @ 5 volts - W-only:
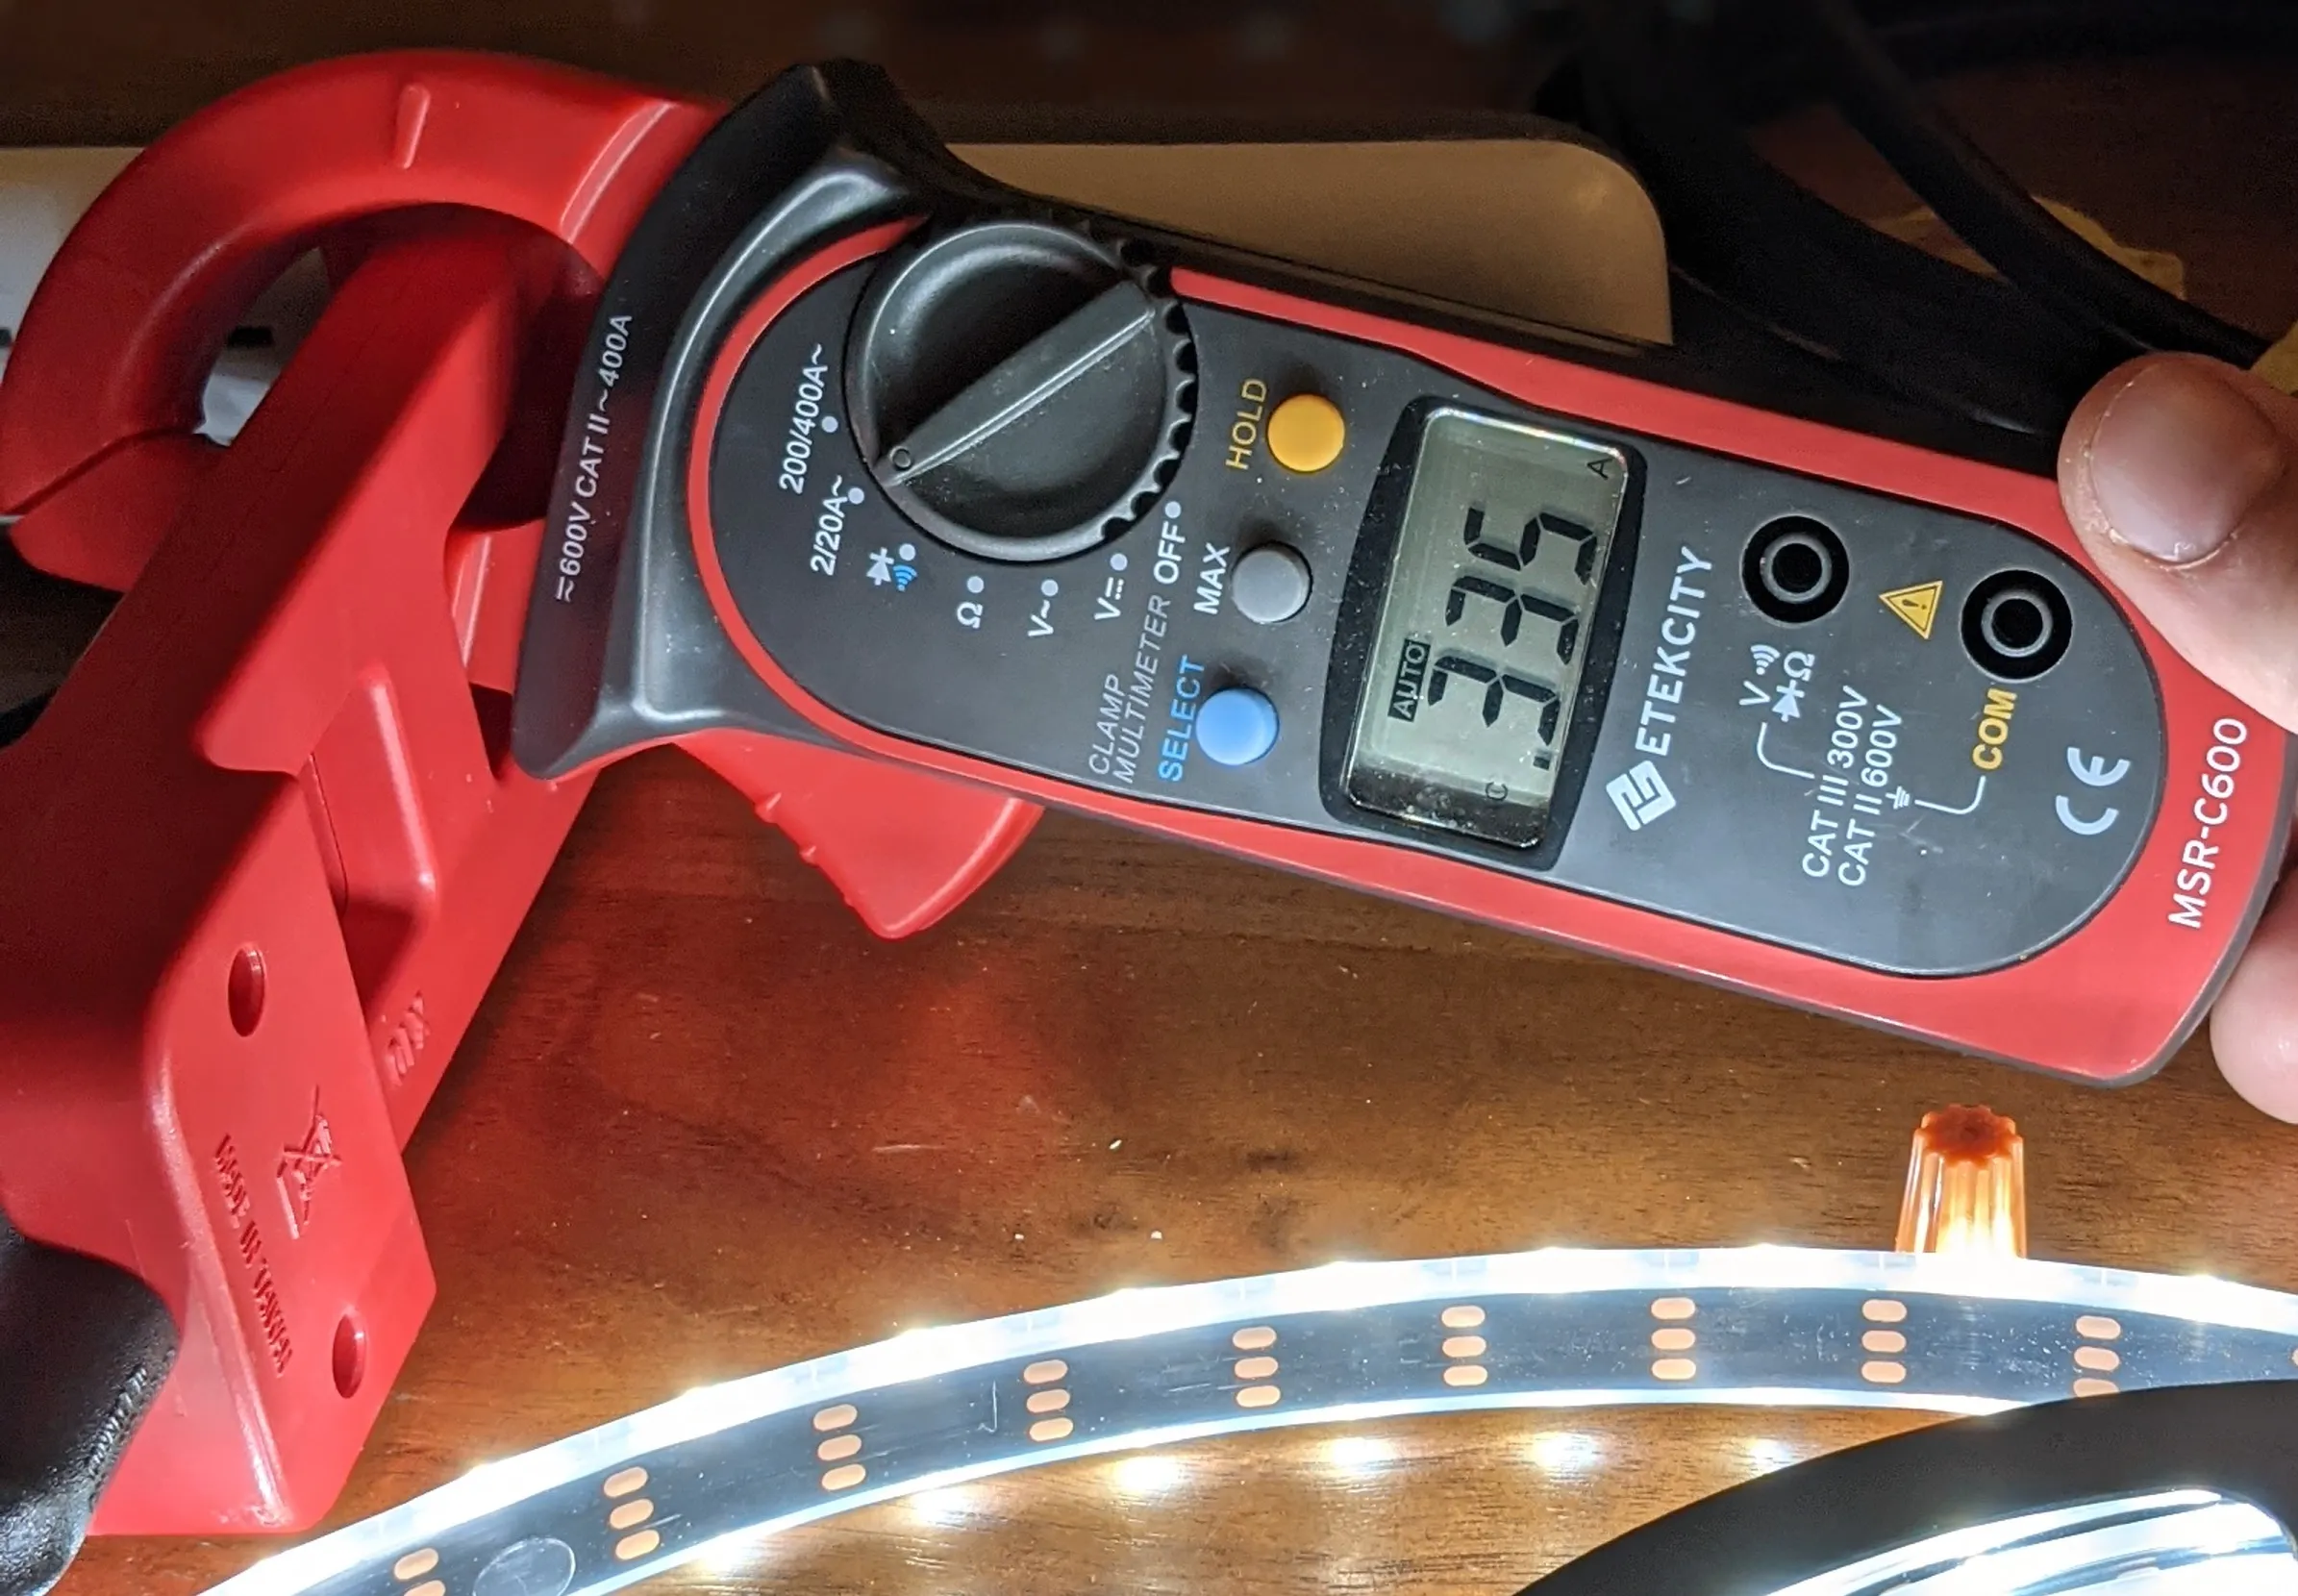
0.286a * 120v / 5v = 6.9 amps @ 5 volts - RGBW Transformed:
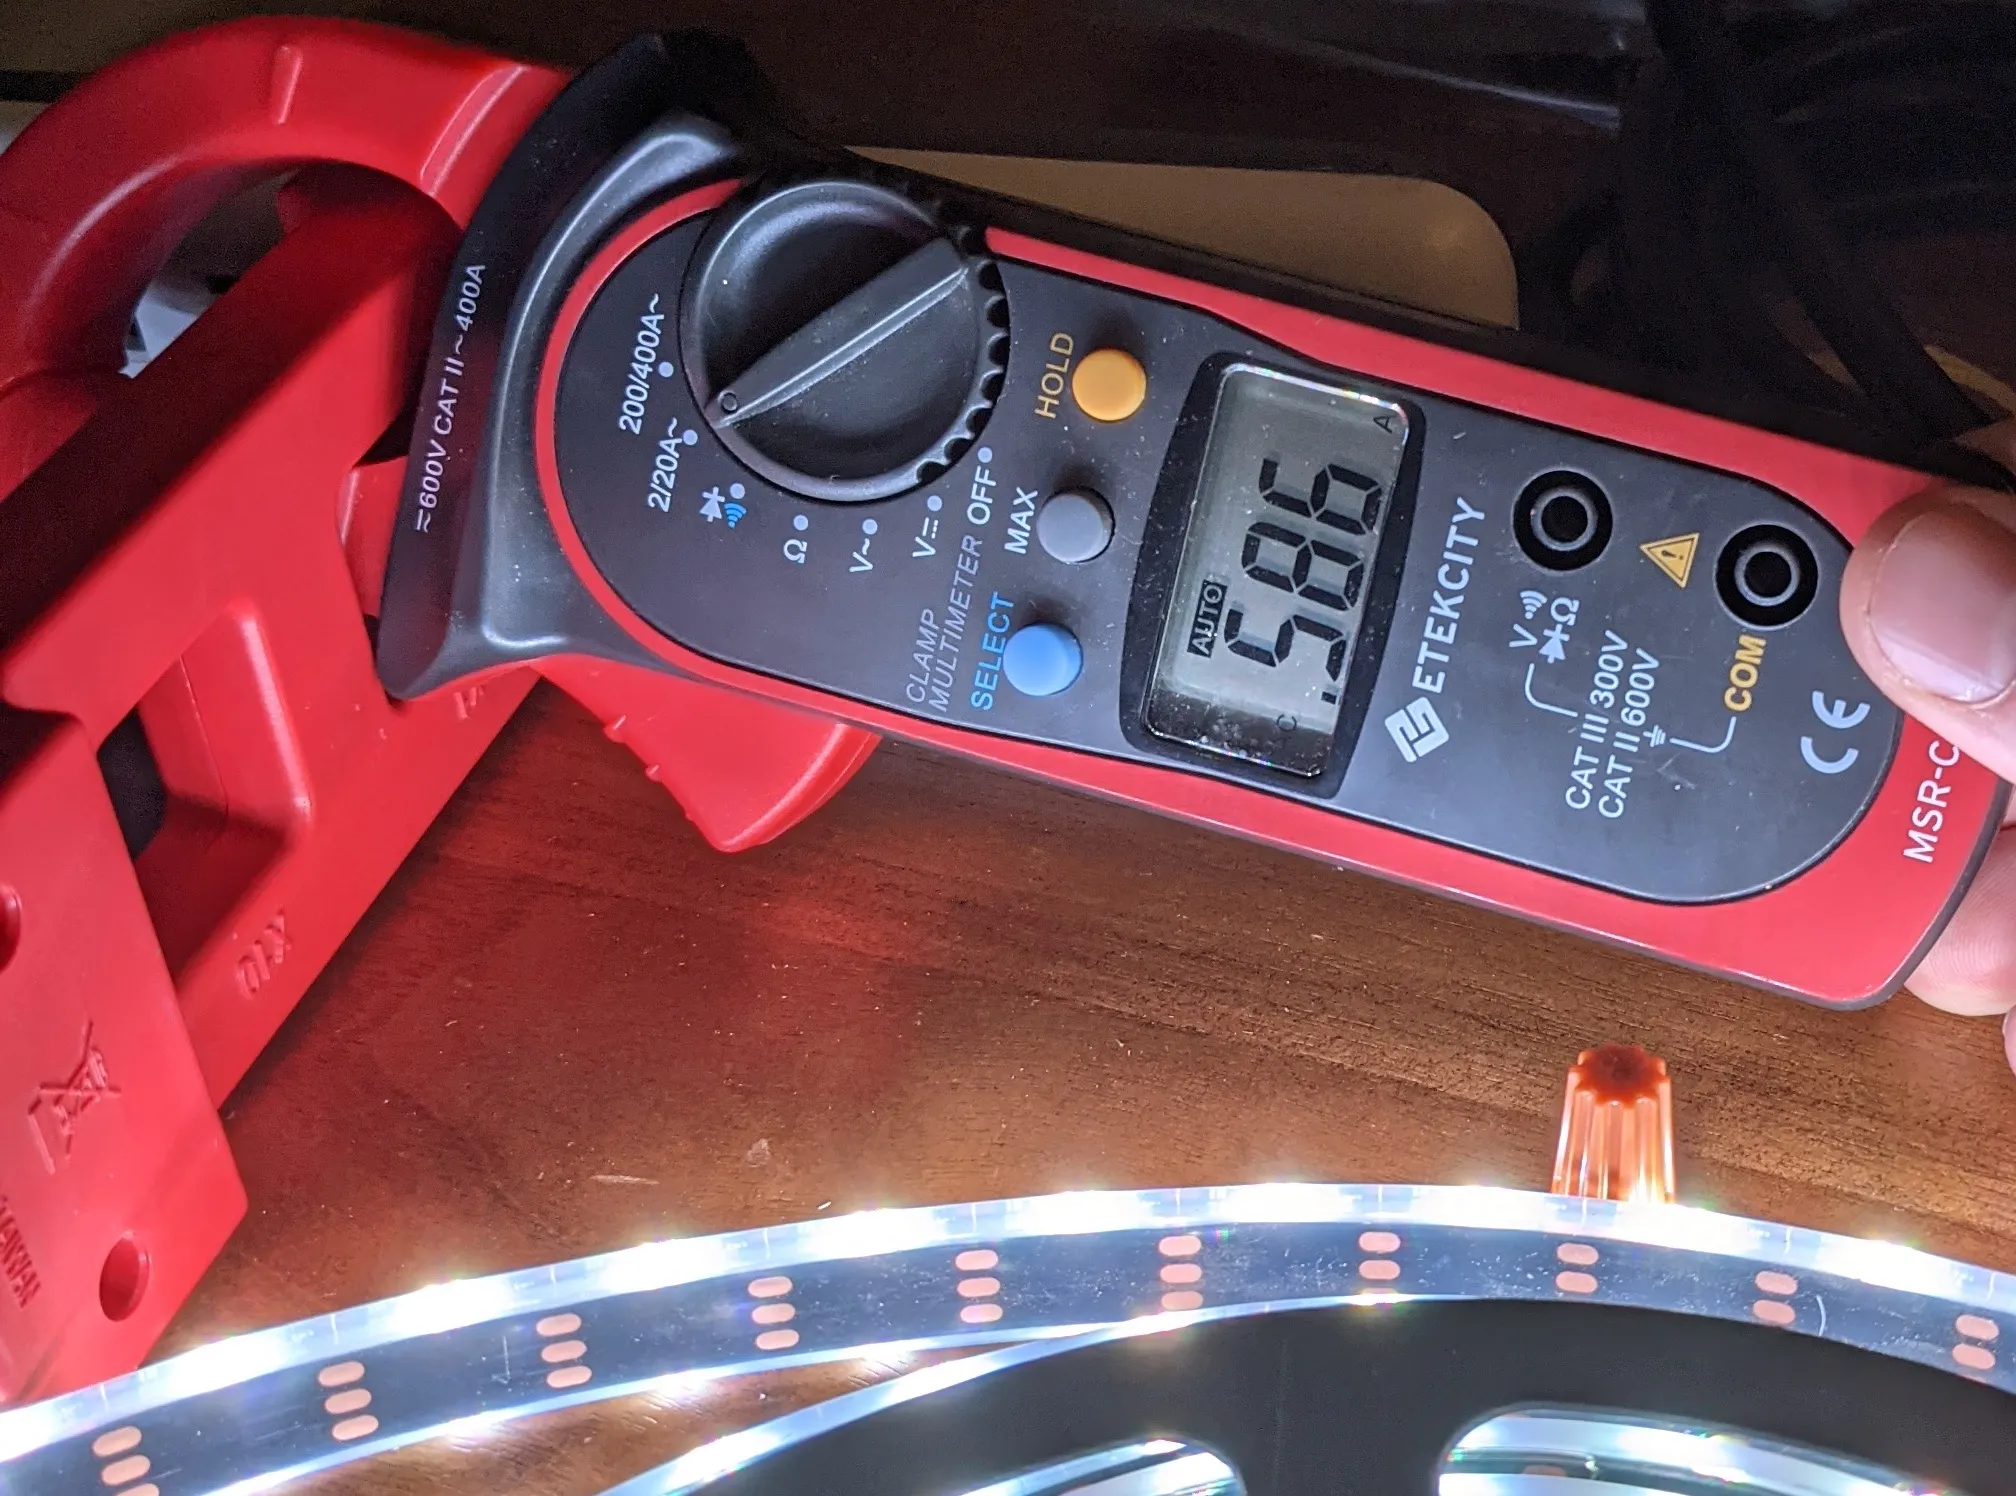
0.335a * 120v / 5v = 8 amps @ 5 volts - RGBW Full (all LEDs max):
0.586a * 120v / 5v = 14 amps @ 5 volts
For RGBW Transformed, 8 amps * 5 volts = 40 watts, which is 8 watts/meter.
Results
Power calculations for final setup:
- ~12 feet (~3.6 meters)
- ~10 watts per meter (to be safe), = 10 * 3.6 = 36 watts
- 36w / 5v = ~6 amps
Only possible change here is I want to have a SUPER BRIGHT mode, where I turn on all LEDs to the max. Probably not worth the extra transformer size to supply the required amps. But maybe it is....
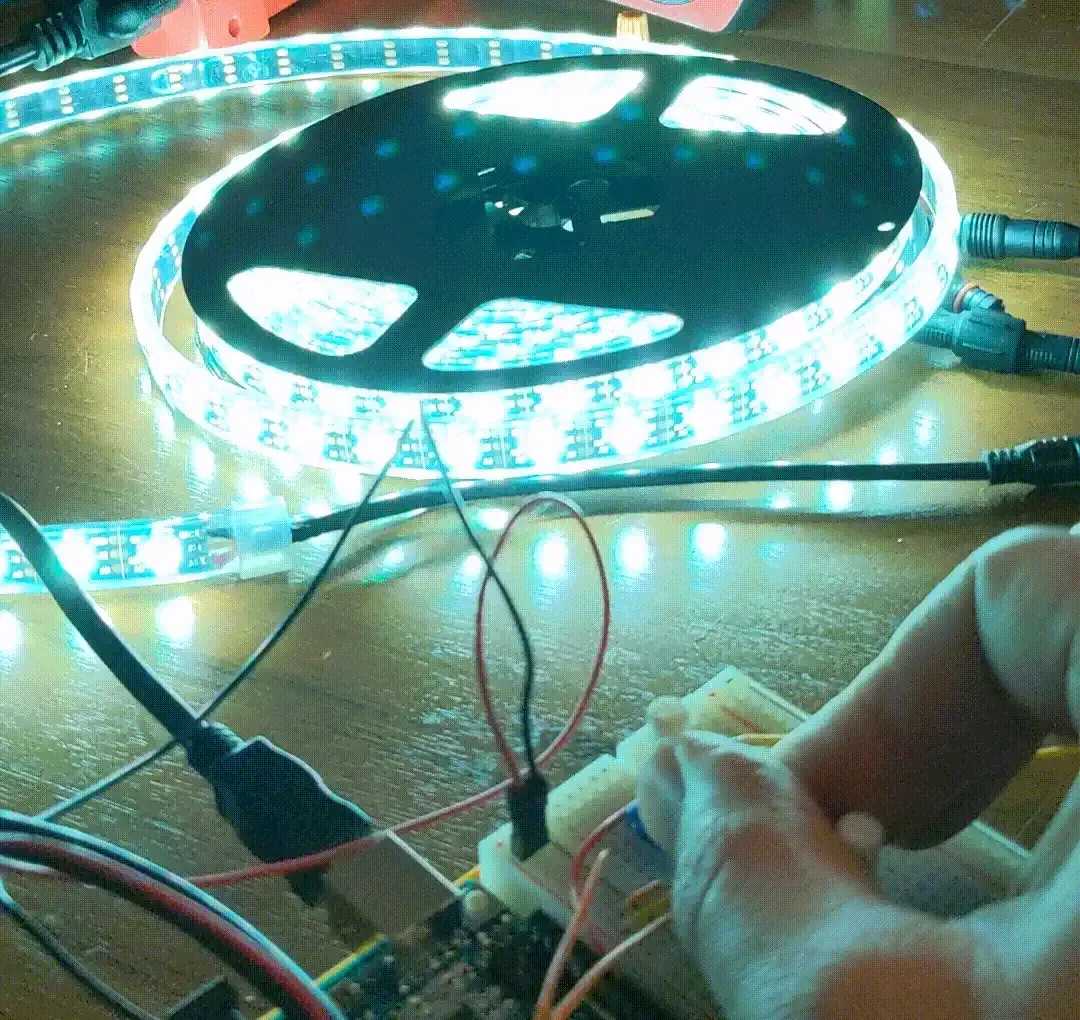
Sending Enough Power
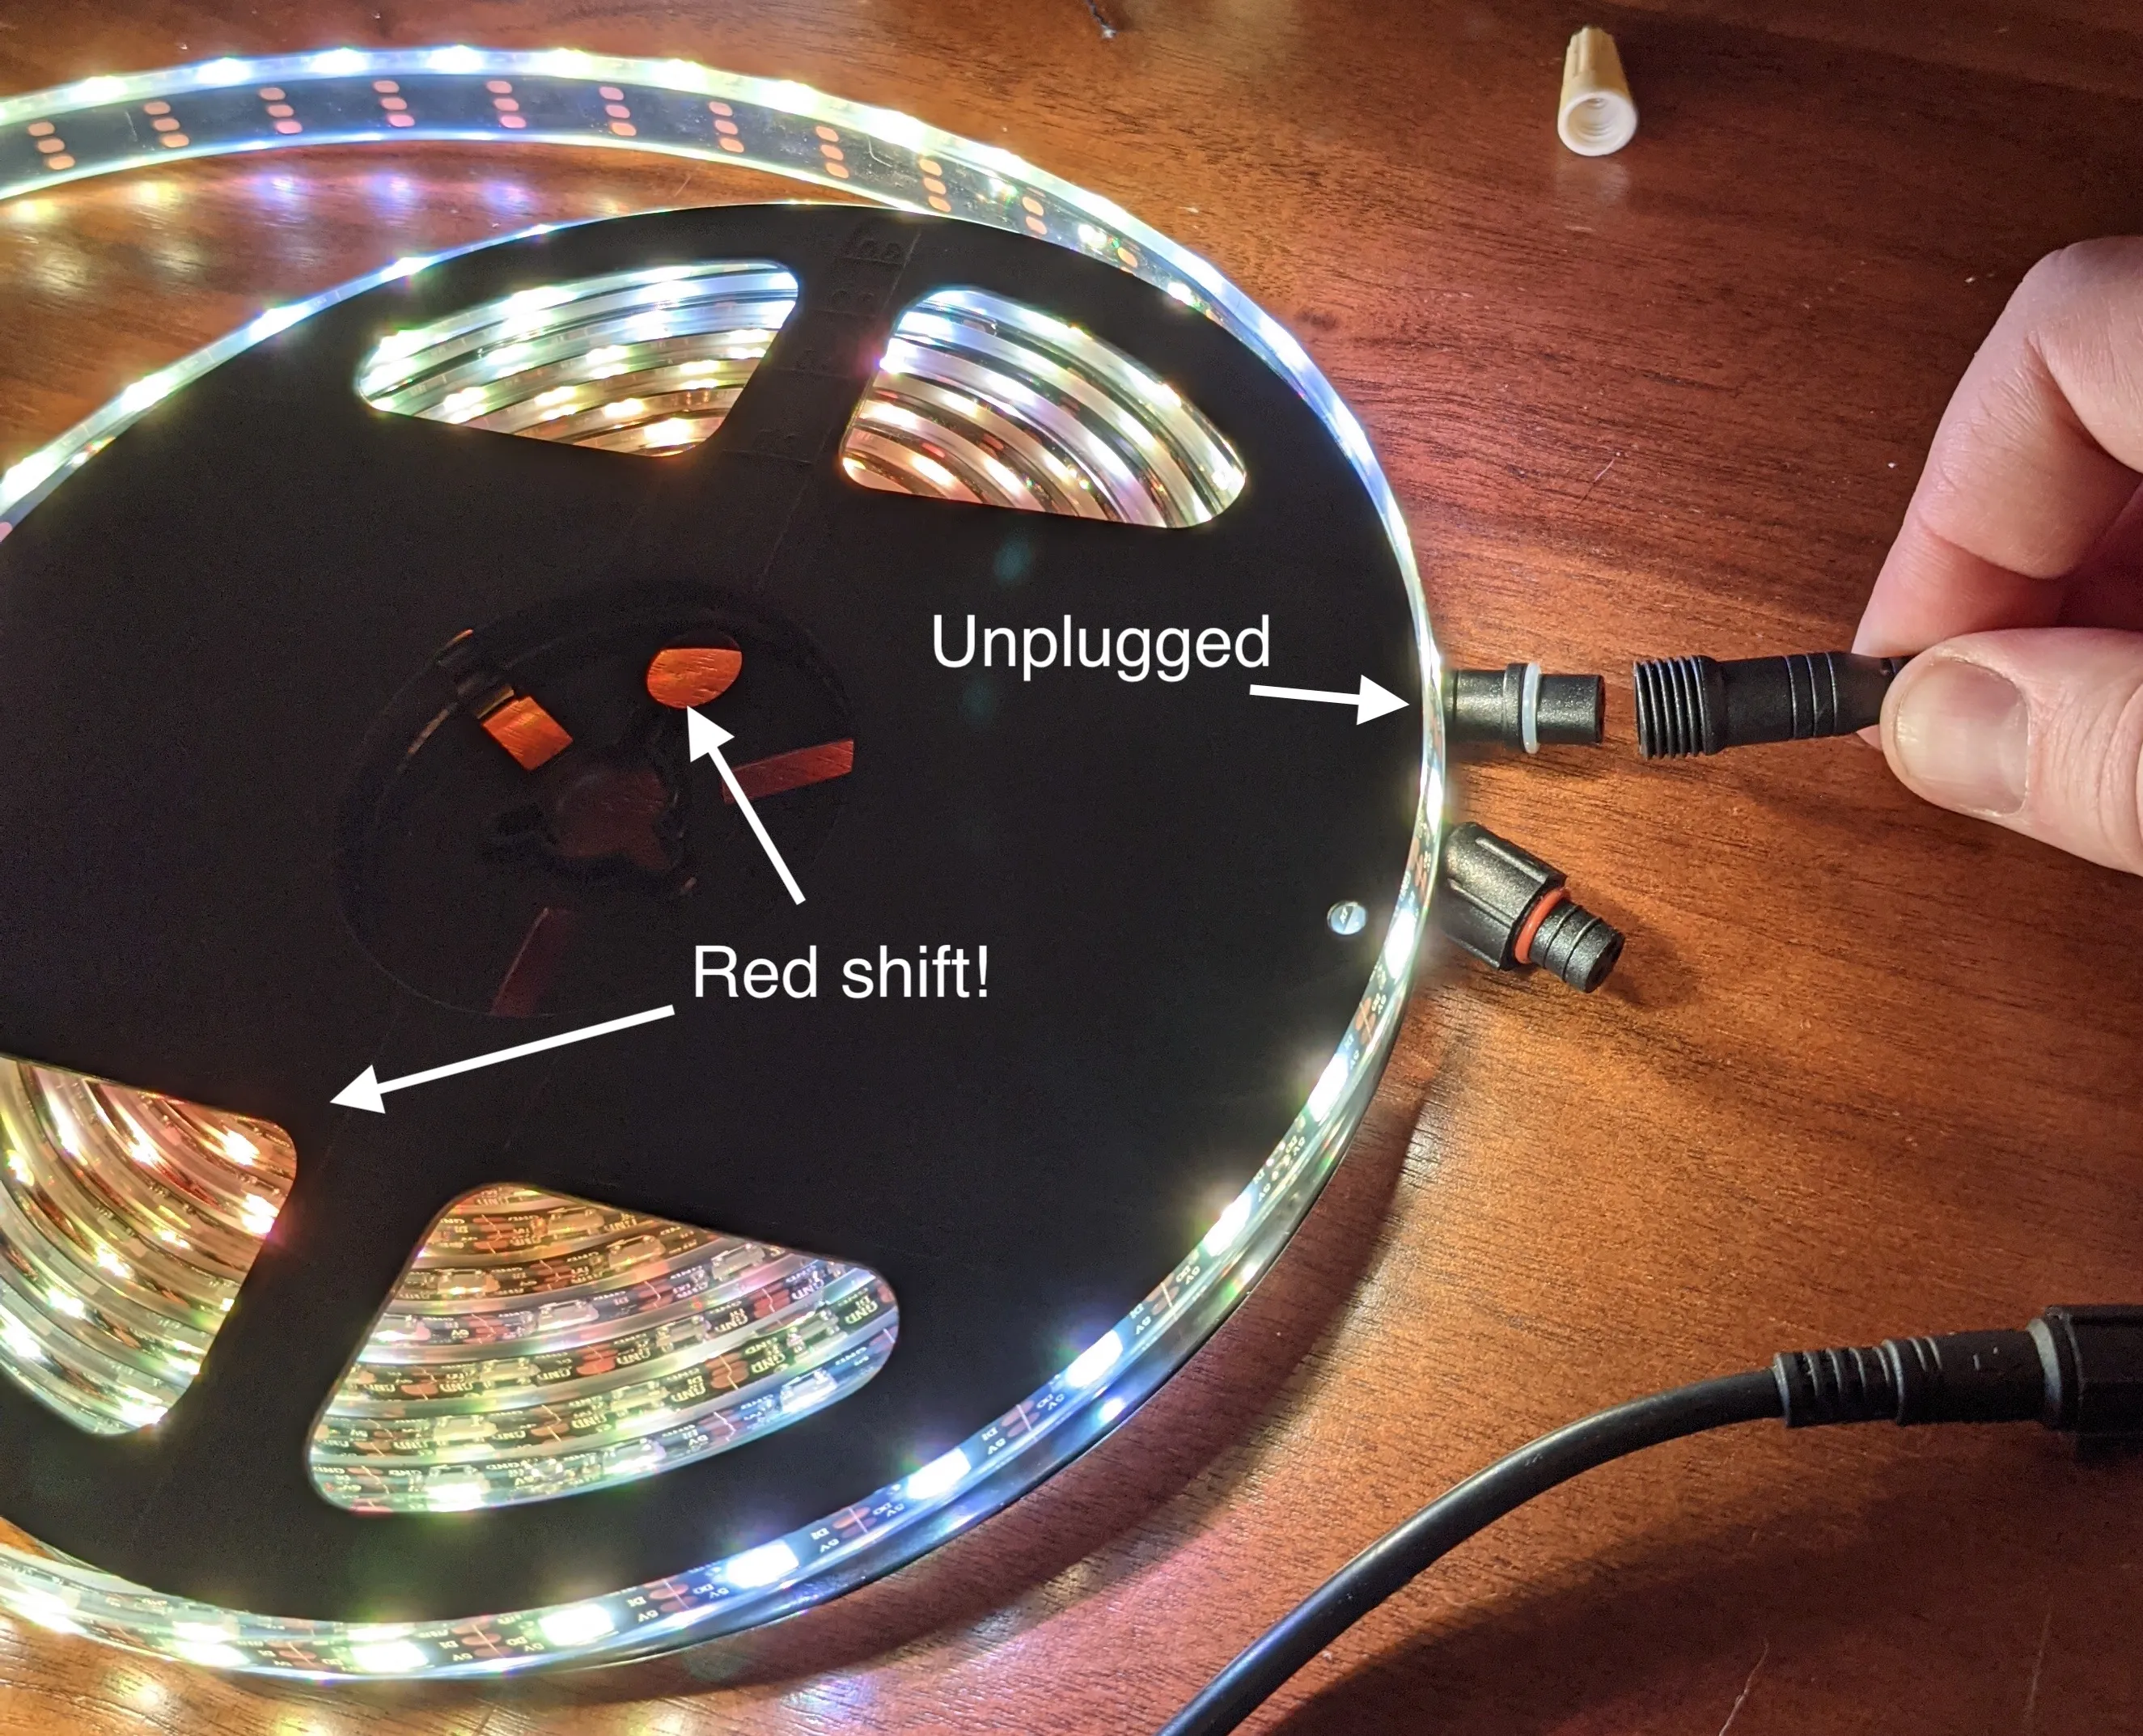
Since this strip is 5 meters, there is too much resistance in the internal wires to get the 5v down the whole thing. If you don't power both ends, it will start to red-shift. Like so:

Software
I used the Arduino IDE, the FastLED library, and mostly followed the example from this post about hack FastLED to support RGBW. This works enough for my use-case here.
See my gist here for the source code I used for this testing setup.
Transforming RGB to RGBW
I have a problem now - I can turn on the red, green, blue, and warm-white, but I don't have a formula to take an RGB input and use the warm-white LED well.
To experiment with this, I create 3 color transformations:
1) No WW Led
Just RGB, to see what that looks like.
2) Greedy "True White" LED Algorithm
Treat the WW LED as "true white", remove the smallest RGB value from all RGB values, set the "white" LED to that value, and then subtract that from the RGB values.
Example:
- Input:
R=100, G=200, B=220 - Smallest RGB value is
R = 100 - Set
W = 100 - Subtract that from RGB values, so
- Output:
R=0, G=100, B=120, W=100 - Hand-wavy power comparison:
- RGB power =
100 + 200 + 220 = 520 - RGBW power =
0 + 100 + 120 + 100 = 320
- RGB power =
Algorithm:
3) Greedy "Transformed White" LED Algorithm
Unfortunately our LED is not "true white", and does not represent the RGB color (255, 255, 255). Instead, I can use this chart to find the approximate RGB value of my 4500k color temperature warm white LED: (255, 219, 186).
The basic algorithm here finds, for each R, G, and B, what would the "transformed white" value need to be to produce that channel value. Then, use the minimum of those values to get the appropriate "transformed white" value. Finally, subtract the appropriate channel values from R, G, and B given the white value, and you're done.
Algorithm:
Results
See the results in this image here, which shows the algorithms representing the color white (255, 255, 255)
")
- "100% RGB" is the first algorithm, where no white LED is used at all.
- Blue tint - this isn't a good white reproduction as the LEDs can have slightly different strengths.
- Output:
(255, 255, 255, 0)
- "100% WW" is the second algorithm, where the only WW LED is used.
- This is a little too 'warm' for an accurate white.
- Output:
(0, 0, 0, 255)
- "RGB+WW" is the third algorithm, where the WW temperature is taken into account.
- Looks pretty good!
- Output:
(0, 36, 69, 255)
Conclusion
Alright, so I think I'm relatively happy with this setup & the color transformation. I might lower my power supply amps to make it smaller, and maybe do 2 of them to make them even smaller (for both sides of the strip). I want to fit them in my 2x4!
Next time - I still have a lot of stuff to do:
- Diffusion! How will I diffuse the LEDs?
- Lower density LED strip! Maybe I don't need 60 LEDs/meter, I could do 30 instead and have less power.
- Using a Metro Mini instead of the Uno for size.
- Buttons for turning sections on and off! Need to get panel mount buttons maybe so they can stick out of wood
- Planning out how I'm going to fit all of these in the 2x4...
- What about end caps! I completely routed my first 6' wood piece, that was probably a mistake. I'll have to maybe cut the other piece in half so I can but the 3' pieces on the ends & make sure I don't route all the way...
- But.. I need a way to open the thing up to put in the diffusers, or take them out to unscrew it from the cabinet...
- Probably more things.
Let me know if you have ideas, thoughts, or questions!
Published: Fri Jan 08 2021 16:00:00 GMT-0800 (Pacific Standard Time)